

Database: initializing, upgrading, and recreating
How operators create the database, upgrade it to a new release, and, on development and test instances only, erase it.
The schema lives in schema/, one directory per module with a file per database (schema/<NN>-<module>/sqlite.sql and postgres.sql). The server binary holds the schema of its release, and
my schema apply applies it: every deployment runs it as a one-off job before the server, with the server image and the server’s
database settings, so the server image is the only image an instance needs.
my serve never applies the schema. Started on a database without it, the server answers 503 on /readyz (see Start the server).
Data that a schema change has to carry over (a column split in two, a value moved to a new table) is rewritten by the server image’s
own my db upgrade, which runs once per release after the schema is applied. The full order is in Upgrading.
Initializing (applying the schema)
Section titled “Initializing (applying the schema)”my schema apply runs only the statements that bring the database to the schema of its release: on an empty database it creates everything,
on an up-to-date one it does nothing. It is safe to run any number of times, and every upgrade runs it again.
With my schema apply
Section titled “With my schema apply”my schema apply reads the database settings of the server’s configuration (database, database_url, and database_dev_url,
from -config <file> or the environment; it needs no other setting) and brings the database to the schema of the binary’s release:
my schema apply -dry-run # print the SQL statements it would run, and change nothingmy schema apply # run them- It prints the SQL statements it runs, and runs them in one transaction: when one fails, none of them stays.
A database that already matches the schema is left unchanged (
ok: the database matches the schema; nothing to apply). - A plan that drops a table or a column is refused, and nothing runs, unless
-allow-destructiveis given. Pass it only when the release notes call for it, after a backup. Rebuilding a SQLite table to change it does not count as a drop. - On PostgreSQL it builds the schema it compares with in a temporary schema of the same database and drops it at the end,
also on failure; the role needs the privilege to create a schema there. Where it has none, set
database_dev_urlto another database where it has (database_dev_url). Runs against one database wait for each other, so two at once both succeed. - It supports
database = sqliteanddatabase = postgres, and exits with1when it applied nothing because of an error or a refused drop.
From v0.1.0 on, an upgrade between supported releases never contains a difference that loses data; releases before v0.1.0 may drop columns
and tables, and need -allow-destructive. Read the SQL with -dry-run before every upgrade (see Upgrading).
Through a connection pooler
Section titled “Through a connection pooler”my schema apply must reach the database directly. It holds a session-level lock, which a pooler in transaction mode (PgBouncer’s transaction pooling, Neon’s pooled connection string) does not keep: through one, two runs at once hung rather than failed. Give it a direct URL as database_url. pool_max_conns and the other pool_* parameters may stay in it, and in database_dev_url and stream_postgres_url: the commands that open no pool ignore them. my db upgrade, my db upgrade -check, and the console take the same URL.
my serve can use a pooler in transaction mode, as long as:
- the pooler handles protocol-level prepared statements, which the server uses for every query: PgBouncer 1.21 or later with
max_prepared_statementsabove 0, which Neon’s pooled connection string has. Behind a pooler without them, statements fail at random withprepared statement ... does not existoralready exists: adddefault_query_exec_mode=execto the URL, which avoids them for one more round trip per query. stream_postgres_urlholds a direct URL whenstream = postgres, sinceLISTENbelongs to a session. A listener on a pooled URL connects and then receives nothing.- the URL has no
search_pathor other parameter the pooler refuses at connection: PgBouncer closes such a connection unlessignore_startup_parameterslists it.
Docker Compose
Section titled “Docker Compose”In deploy/docker/compose.yaml, three one-off services of the server image run in this order, each only
after the previous one succeeded, and the server (my) starts last:
| Service | Runs |
|---|---|
upgrade-check |
my db upgrade -check (passes on an empty database) |
schema |
my schema apply, on /data/my.db or, with the layer compose.postgres.yaml, on its PostgreSQL (Docker Compose files) |
upgrade |
my db upgrade |
cd deploy/dockerdocker compose up -d # pulls the image of MY_VERSION; the three one-off services run in order, then my startscurl -fsS localhost:8080/readyz # ready when it answers {"status":"ok"}docker compose exec -T my my admin create -username alice -email alice@example.com < password.txt- If any of the three fails,
mydoes not start. Read its output withdocker compose logs upgrade-check(orschema,upgrade). - Creating administrators is covered in Administrators and roles.
Other platforms
Section titled “Other platforms”Without Compose, run my schema apply of the server image as a one-off job (a Kubernetes Job or init container, a Cloud Run job, and so on),
with the same database settings as the server:
# SQLite: mount the volume that holds the database file at /datadocker run --rm -v my_data:/data -e MY_DATABASE=sqlite -e MY_DATABASE_URL=/data/my.db my schema apply
# PostgreSQLdocker run --rm -e MY_DATABASE=postgres -e MY_DATABASE_URL='postgres://my:...@db.example/my' my schema apply
The connection pool
Section titled “The connection pool”PostgreSQL’s pool follows the pool_* parameters of database_url: pool_max_conns (by default the greater of 4 and the CPU count) and pool_min_conns, the connections it keeps when nothing is asked, with pool_max_conn_idle_time (30 minutes) closing the rest. Set pool_min_conns for an instance whose requests come far apart, or each one opens a connection.
SQLite takes pool_max_conns too, by the same default, and pool_max_idle_conns, the most idle connections it keeps, a ceiling and not a floor like pool_min_conns (by default all of them, and none is closed by time, so a quiet instance answers at once). A new connection parses the schema before its first query, which is why the pool keeps its connections.
Upgrading
Section titled “Upgrading”An upgrade to a new release always runs these steps in this order, with the new release’s server image:
- Back up the database (and, with the filesystem blob store, the media). See Backing up.
my db upgrade -check. It changes nothing. It exits with1when the new schema would drop data that the database has not carried over yet, and names the release to upgrade through first; then stop and follow Skipping releases. An empty database passes.my schema apply, as in Initializing. Check the SQL with-dry-runfirst.my db upgrade. It runs each data upgrade step of the release that the database has not recorded yet, rebuilds the projections those steps name, and records each step. Run again, it does nothing. If a step fails it exits with1; the steps that completed stay recorded, and running it again resumes from the failed one.- Start the new server. It answers
503on/readyzand logs the missing steps until every data upgrade step of its release is recorded.
my serve never runs my db upgrade -check, my schema apply, or my db upgrade; they are one-off jobs. Run only one of them against a database at a time.
Running the steps in one job
Section titled “Running the steps in one job”my upgrade runs steps 2 to 4 in one process, after the checks of my config check, so that a single one-off job (a Cloud Run job
execution, an ECS task, a Kubernetes Job) carries the whole migration:
my config checkmy db upgrade -checkmy schema apply, with-allow-destructivewhenmy upgradeis given itmy db upgrade
It stops at the first step that fails and exits with that step’s code; the later steps do not run. Each step prints a line that names it,
such as ==> my schema apply, and then the output of that command, so the job’s log shows where it stopped. After fixing the cause, run
my upgrade again: the steps that completed find nothing left to do. -config <file> is passed to every step.
my upgrade -dry-run runs my config check, my db upgrade -check, and my schema apply -dry-run, and changes nothing: read the SQL it
prints before the upgrade. Back up the database before my upgrade, as in step 1; it does not switch to the maintenance mode or start
the server.
Most releases add no data upgrade step: my db upgrade -check prints ok: the database can be upgraded to this release and, on a
database that recorded the steps of the earlier releases, my db upgrade prints ok: no data upgrade step to run. A new database records
every step of the release in its first my db upgrade, with nothing to rewrite. Run both anyway, so the procedure does not depend on reading
every release note.
The release notes’ Upgrading section lists the steps of each release.
The server during an upgrade
Section titled “The server during an upgrade”Zero-downtime upgrades are not guaranteed. The previous server keeps working on the new schema for the short time between steps 3 and 5,
but it cannot take part in the data upgrade steps. Switch to the maintenance mode for the upgrade: in the maintenance mode
my serve opens no database connection, so the backup is consistent and nothing writes while the steps run.
Keep the maintenance window within a few hours (how long).
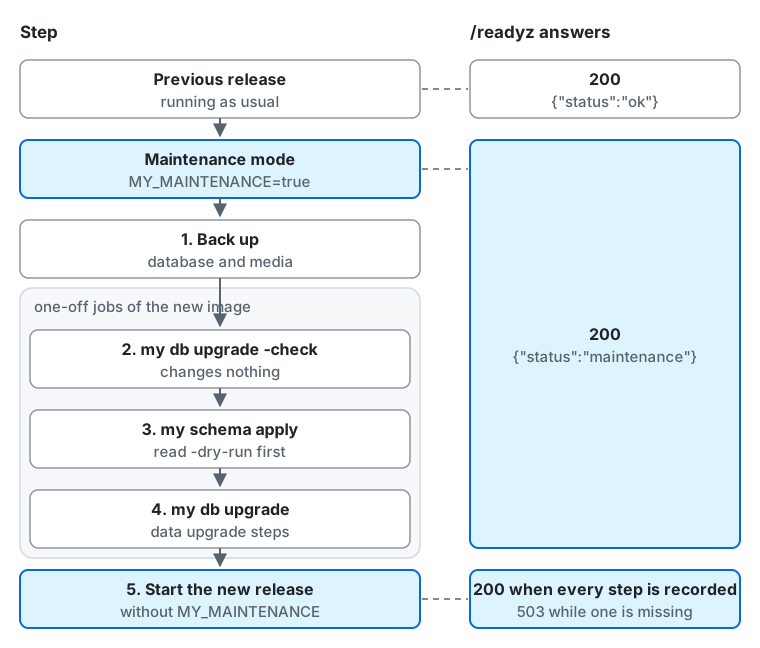
From the top of the diagram down:
- Previous release. The server runs as usual, and
/readyzanswers200with{"status":"ok"}. - Maintenance mode. Redeploy with
MY_MAINTENANCE=true. From now until the new release starts,/readyzanswers200with{"status":"maintenance"}, so the load balancer keeps the instances while nothing reaches the database. - 1. Back up the database and the media.
- 2 to 4: the one-off jobs of the new image.
my db upgrade -checkchanges nothing;my schema applyruns after you read its-dry-run;my db upgraderuns the data upgrade steps. - 5. Start the new release without
MY_MAINTENANCE./readyzanswers200with{"status":"ok"}once every data upgrade step of the release is recorded, and503while one is missing (or the schema is not applied).
With Docker Compose, docker compose up replaces the maintenance-mode container before the one-off jobs run, so nothing answers
on /readyz during steps 2 to 4 (Docker Compose).
Checking the SQL with -dry-run
Section titled “Checking the SQL with -dry-run”Before step 3 applies anything, run my schema apply -dry-run and read what it would run.
Additions (CREATE TABLE, ADD COLUMN, CREATE INDEX) are what most releases contain. A projection table may also be rebuilt,
which my db upgrade then refills from its events. A DROP of anything else, or a type change, should be listed in the release notes’
Breaking changes section; if it is not, stop and report it before applying. my schema apply refuses a plan that drops a table
or a column unless -allow-destructive is given.
Docker Compose
Section titled “Docker Compose”docker compose up -d runs steps 2 to 5 by itself, in order (see the table in Initializing). If any of them fails, the new server does not start.
cd deploy/docker
# 1. Switch to the maintenance mode. --no-deps keeps the one-off services from running.MY_MAINTENANCE=true docker compose up -d --no-deps --force-recreate my
# 2. Back up the volume (database and media) while the maintenance mode holds no connection.docker run --rm -v my_data:/data -v "$PWD":/backup busybox tar czf /backup/my-data-$(date +%Y%m%d%H%M).tar.gz -C /data .
# 3. Set MY_VERSION in .env to the new version (0.2.0, or its digest form 0.2.0@sha256:... from the notes), and pull it.docker compose pull
# 4. Check the SQL that the schema service will run.docker compose run --rm --no-deps upgrade-checkdocker compose run --rm --no-deps schema schema apply -dry-run
# 5. Upgrade: upgrade-check, schema, upgrade, then my starts again without the maintenance mode.docker compose up -dcurl -fsS localhost:8080/readyz
docker compose up replaces the my container before the one-off services run, and starts the new one only after all three succeeded.
If one fails, docker compose up reports it and the server stays stopped: put the exported maintenance page in front meanwhile.
Read docker compose logs <service>, then either fix the cause and run docker compose up -d again, or roll back.
The volume name my_data is the Compose project name (my) followed by the volume name (data).
MY_VERSION is the only thing an upgrade changes, and nothing changes it for you: there is no latest tag, and 0.1 moves only within v0.1. With MY_VERSION=0.1, step 3 is docker compose pull alone, and it takes the latest patch.
To build from source instead, check out the new release’s tag and use docker compose -f compose.yaml -f compose.build.yaml build in step 3, and the same -f options in the other steps.
Kubernetes
Section titled “Kubernetes”Run steps 2 to 4 as one Job before rolling out the new image. Init containers run one after another, each only after the previous one succeeded, and the main container runs last, so a failure stops the Job before the next step. Give the containers the same configuration as the Deployment.
apiVersion: batch/v1kind: Jobmetadata: name: my-upgrade-v0-2-0spec: backoffLimit: 0 template: spec: restartPolicy: Never initContainers: - name: upgrade-check image: ghcr.io/mycroblog/my:0.2.0 args: [db, upgrade, -check] envFrom: [{ secretRef: { name: my-config } }] # the Deployment's settings - name: schema image: ghcr.io/mycroblog/my:0.2.0 args: [schema, apply] envFrom: [{ secretRef: { name: my-config } }] containers: - name: upgrade image: ghcr.io/mycroblog/my:0.2.0 args: [db, upgrade] envFrom: [{ secretRef: { name: my-config } }]kubectl set env deployment/my MY_MAINTENANCE=true && kubectl rollout status deployment/my# back up, and check the SQL with a one-off Pod of the new image: my schema apply -dry-runkubectl apply -f my-upgrade-v0-2-0.yamlkubectl wait --for=condition=complete --timeout=30m job/my-upgrade-v0-2-0kubectl set image deployment/my my=ghcr.io/mycroblog/my:0.2.0kubectl set env deployment/my MY_MAINTENANCE-kubectl rollout status deployment/myIf the Job fails, kubectl logs job/my-upgrade-v0-2-0 -c upgrade-check (or -c schema, -c upgrade) shows why, and the Deployment stays on the previous image.
With SQLite on a volume, mount the same volume in the Job and stop the Deployment’s pods first: SQLite takes one writer.
Cloud Run
Section titled “Cloud Run”With the OpenTofu module, an upgrade is an apply of the new release, which runs my upgrade in the migration job before the services take
the new image, and stops there when it fails: see Deploying on Cloud Run. By hand:
Cloud Run jobs run one container each, so create one job per step and execute them in order with --wait, which fails when the job fails.
Give the jobs the same environment variables and secrets as the service.
gcloud run services update my --region=asia-northeast1 --update-env-vars=MY_MAINTENANCE=true# back up (see below)
gcloud run jobs deploy my-upgrade-check --region=asia-northeast1 --image=ghcr.io/mycroblog/my:0.2.0 \  --args=db,upgrade,-check --set-env-vars=... --set-secrets=...gcloud run jobs deploy my-schema --region=asia-northeast1 --image=ghcr.io/mycroblog/my:0.2.0 \  --args=schema,apply --set-env-vars=... --set-secrets=...gcloud run jobs deploy my-upgrade --region=asia-northeast1 --image=ghcr.io/mycroblog/my:0.2.0 \  --args=db,upgrade --set-env-vars=... --set-secrets=...
gcloud run jobs execute my-upgrade-check --region=asia-northeast1 --wait &&  gcloud run jobs execute my-schema --region=asia-northeast1 --wait &&  gcloud run jobs execute my-upgrade --region=asia-northeast1 --wait &&  gcloud run deploy my --region=asia-northeast1 --image=ghcr.io/mycroblog/my:0.2.0 --remove-env-vars=MY_MAINTENANCE
To check the SQL first, deploy the schema job with --args=schema,apply,-dry-run, execute it, and read its logs before redeploying it for the apply.
Backing up
Section titled “Backing up”Take the backup after the server stopped writing (in the maintenance mode, or stopped) and before any step of the upgrade. Backup and restore covers each part in full; for an upgrade:
-
SQLite: copy the database file together with its
-waland-shmfiles, while no process has it open. With Compose, thetarof the volume above also covers the media in/data/blobs. -
PostgreSQL:
pg_dumpin the custom format, whichpg_restorereads.Terminal window pg_dump --format=custom --file=my-$(date +%Y%m%d%H%M).dump "postgres://my:...@db.example/my"A managed database’s own backup (a Cloud SQL on-demand backup, an RDS snapshot) works too; take it at the same point.
-
Media: the filesystem blob store is a directory to copy with the database.
-
The KEK is not in the database. Keep it where it already is; a restored database needs the same KEK.
Rolling back
Section titled “Rolling back”There are no reverse migrations. To go back, restore the backup taken before the upgrade, then start the previous release:
- Stop the new server (or switch it to the maintenance mode).
- Restore the backup: with Compose, extract the archive into the emptied volume
(
docker run --rm -v my_data:/data -v "$PWD":/backup busybox sh -c 'rm -rf /data/* && tar xzf /backup/<archive> -C /data'); with PostgreSQL,pg_restore --clean --if-exists --dbname=<url> <dump>. - Start the previous release’s image (with Compose, set
MY_VERSIONback to the previous version, thendocker compose up -d).
Whatever the new release wrote after the upgrade is lost, so roll back soon after the upgrade, before the instance federates much.
Skipping releases
Section titled “Skipping releases”Each release supports upgrades from the same minor version (for example v0.2.1 to v0.2.4) and from the latest patch release of the previous
minor version (the latest v0.1.x to v0.2.y). Patch releases never remove columns or tables, so within a minor version any order works.
To cross more than one minor version, upgrade through the latest patch release of each minor version in turn, running the whole procedure every time.
From v0.1.3 to v0.4.0, for example: the latest v0.1.x, then the latest v0.2.x, then the latest v0.3.x, then v0.4.0.
my db upgrade -check stops a skip that would lose data and names the release to go through; nothing has changed at that point.
Checking and rebuilding projections
Section titled “Checking and rebuilding projections”Some tables are projections: the server derives them from the events and resources of their module (an account’s restrictions from its moderation actions, say). The worker checks every projection once a day and corrects any difference it finds. To check or correct one by hand:
my projection list # each projection with its module and tablesmy projection verify [<name>] # derive every projection, or the one named, and print the rows that differ; changes nothingmy projection rebuild [<name>] # derive them the same way and write the difference<name>is a projection or one of its tables.verifyprints the rows the tables hold but the sources do not derive (-) and the rows the sources derive but the tables lack (+), and exits with1when any differ.rebuildwrites at most 500 rows per transaction, so readers never see an emptied projection. Run it while the instance is quiet: a row that changes during the rebuild keeps its new value, and a laterverifyreports any difference left.
Recreating (erasing every row)
Section titled “Recreating (erasing every row)”Recreating means emptying the database and applying the schema again. From v0.1.0 on, recreating is for development and test instances only.
Never recreate a public instance that federates with other servers.
Every row is lost and cannot be recovered. The account keys wrapped with the key encryption key (KEK) are lost too, so an account recreated under the same host name gets a different key and is a different Actor to other servers, and its remote follow relationships do not come back. A public instance that cannot apply a schema change rolls back from its backup instead.
There is no my command that erases a database: remove it with the tools of the database, then apply the schema again.
The empty database has no recorded host and account_domain, so the next start records the configured values.
Docker Compose
Section titled “Docker Compose”cd deploy/dockerdocker compose stop my # stop the serverdocker run --rm -v my_data:/data busybox rm -f /data/my.db /data/my.db-wal /data/my.db-shmdocker compose up -d # the one-off services apply the schema to the empty database, then my starts- Uploaded and processed media (
/data/blobs) stay. To erase them with the database, remove the named volume withdocker compose down -v, then rundocker compose up -d. Without-vthe volume is kept. - To keep a copy first, stop the server and copy
my.db(with its-waland-shmfiles) from the volume.
PostgreSQL
Section titled “PostgreSQL”Drop the database and create it again, empty, with the same owner (or with the managed database’s console), then run my schema apply:
# stop every server and job that uses the database firstdropdb --maintenance-db="postgres://postgres:...@db.example/postgres" mycreatedb --maintenance-db="postgres://postgres:...@db.example/postgres" --owner=my mymy schema applyFor LLMs and coding agents:this page as Markdown, llms.txt,llms-full.txt, llms-small.txt